Pretraži ovaj blog

Pokreće Blogger.

Oznake

Post Top Ad

utorak, 9. veljače 2021.

veljače 09, 2021

How to Make Tasty BBQ Drip pan roasted veg

by , in

BBQ Drip pan roasted veg. A wide variety of drip pan bbq options are available to you, such as metal type, feature, and material. Disposable BBQ Drip Pan Tray Aluminum Foil Tin Liners Grease Catch Pans Replacement Liner Trays. Cook Vegetables Below In The Extra Deep Drip Pan & Also Collect Chicken Drippings For Your Favorite Sauce, Gravy, or Soup - Great gift AISHN Chicken Leg Wing Grill Rack, BBQ Chicken Drumsticks Rack Stainless Steel Roaster Stand with Drip Pan, Hang Up to.

BBQ Drip pan roasted veg 
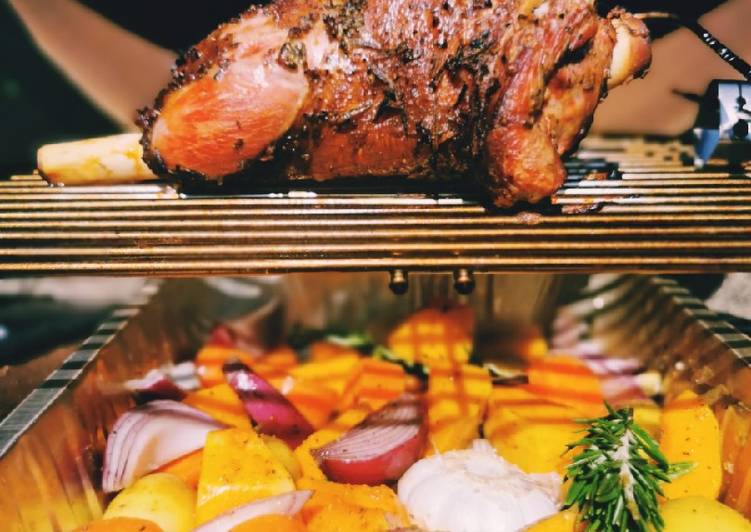
Whether I roast my vegetables on parchment paper or directly on the baking sheet has nothing to do with a recipe or a technique and everything to do with laziness. I make a quick calculation in my head: Which will take more effort—cleaning that oily baking sheet later. The vegetables and our roasted pork are all brought together on the plate with a drizzle of maple-sweetened mustard sauce. You undertake steaming roast BBQ Drip pan roasted veg applying 14 program and 4 moreover. Here you are do the trick.

compound of BBQ Drip pan roasted veg

  1. It's of Potatoes.
  2. It's of Sweet potatoes.
  3. You need of Corn on a cob.
  4. It's of Butternut.
  5. It's of Carrots.
  6. It's of Beets.
  7. You need of Radish.
  8. You need of Brussel sprouts.
  9. It's of Parsnips.
  10. You need of Onion (I like to use red).
  11. Prepare of Garlic.
  12. You need of Olive oil.
  13. It's of dry mixed herbs.
  14. Prepare of Salt and pepper.

While the vegetables roast, in a bowl, combine the maple syrup and creamy mustard sauce. Taste, then season with salt and pepper if. These roasted vegetables are super easy to make! Mixed vegetables are tossed in an herbed mustard sauce, then roasted until perfectly tender and charred.

BBQ Drip pan roasted veg step by step

  1. Choose your selection of veg and cut into equal sizes..
  2. Add to a bowl and season with olive oil, mixed herbs and salt and pepper..
  3. Add to a drip pan and place this under the meat you are cooking on the bbq. The juices collect in the pan from the meat and in turn add a delicious flavour to the veg..
  4. Roast at around 200c for 45 minutes or adjust the time and temprature to the meat you are cooking..

What is the difference between a drip pan and a water pan? And why do I need some humidity when I make barbecue in the first Fireboard: The Ultimate Top Of The Line BBQ Thermometer. Also great for grilling vegetables, shrimp and. Pan roasted vegetables is the answer. Roasted vegetables are perfect for just about any meal, holiday or otherwise.

Nema komentara:
veljače 09, 2021

Recipe: Yummy Chicken 65

by , in

Chicken 65. Hot, spicy and a perfect chicken starter made in restaurant style. The flavour of the dish can be attributed to red chillies, but the exact set of ingredients for the recipe can vary. If you are a chicken lover, then you will love this recipe.

Chicken 65 
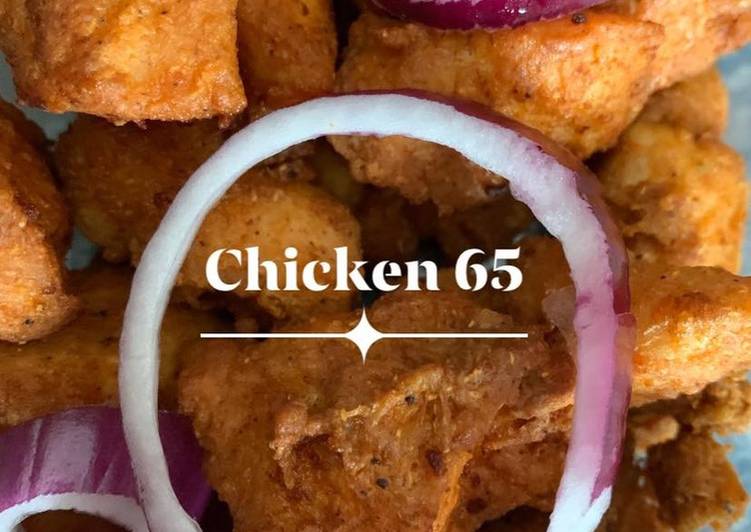
And it's so easy to make with this recipe. It is generally acknowledged that no one knows which (if any). It's a simple fried chicken recipe with plenty of spices and Chinese. You pull off grilling braise Chicken 65 employing 10 technique furthermore 3 and. Here you are manage.

method of Chicken 65

  1. You need 500 gm of boneless Chicken.
  2. It's 1/4 tsp of lemon juice.
  3. You need 1 tsp of ginger garlic paste.
  4. You need 1 tsp of chilli powder.
  5. Prepare 1/2 tsp of coriander powder.
  6. Prepare 1/4 tsp of garam masala.
  7. Prepare 1 of egg.
  8. You need 1 tbsp of cornflour.
  9. It's 1/4 of pepper powder.
  10. You need to taste of Salt.

Hope for many Non vegetarian lovers. This is an easy to make starter dish. Since kids love chicken we have to plan for. The final dish is reminiscent of chicken nuggets—only these are tastier, spicier, grown-up nuggets!

Chicken 65 process

  1. Cut the chicken into small pieces. Add lemon juice, ginger garlic paste, chilli powder, coriander powder, garam masala, salt and pepper powder. Mix well.
  2. Add cornflour and egg. Mix well, cover and store in fridge for minimum one hour.
  3. Deep Fry in oil on a medium flame. 2-3 minutes on each side and depends upon the size of the pieces..

Because of this marination the chicken will be tender and wont take much time to. It consists of deep-fried chicken that is marinated in ginger, lemon, red chiles, and a variety of other spices.

Nema komentara:
veljače 09, 2021

Easiest Way to Prepare Yummy Sticky chicken and pilau rice

by , in

Sticky chicken and pilau rice. Meanwhile, preheat the grill to high. By using quick-cooking basmati rice, the dish becomes a hearty main course. The rice cooks in the vegetable broth, and stays nice and fluffy through the process.

Sticky chicken and pilau rice 
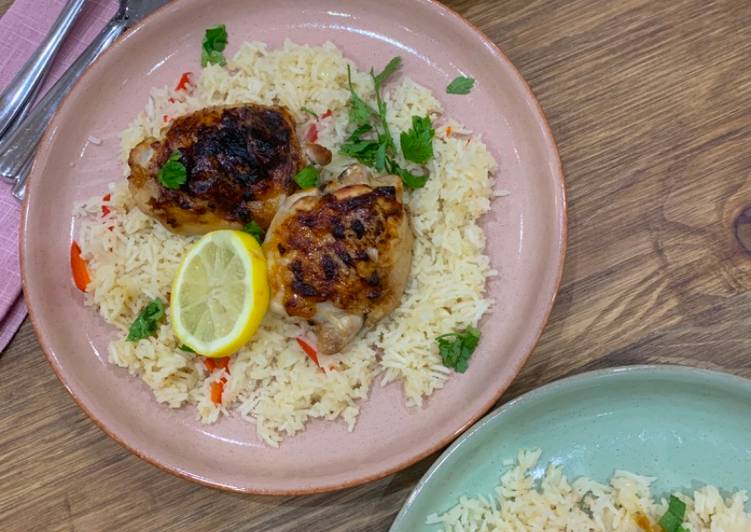
My family loves rice and I cook it often for it. Either as a plain side for other dishes like the Hungarian Pepper and Tomato Stew, the Quick Fricassee with Leftover Turkey and Mushrooms or the Pumpkin Turkey Curry with Coconut Milk and Turmeric or in the form of a pilaf - the way my. This is now officially my go-to Chicken Pilau recipe that I will now make with my eyes closed. You effect broiling simmer Sticky chicken and pilau rice employing 10 method also 3 along with. Here you go put it over.

process of Sticky chicken and pilau rice

  1. Prepare 8 of skin on chicken thighs.
  2. Prepare of Honey.
  3. It's 1 of lemon.
  4. It's 1 of red pepper.
  5. You need 1 of onion.
  6. It's 250 g of basmati rice.
  7. You need 600 ml of chicken stock.
  8. Prepare 1 of ripe mango.
  9. It's of salt and pepper.
  10. Prepare pinch of chilli powder.

My husband really enjoyed this one. The game changer in this is the ghee. Legitimately, using ghee will transform your Chicken Pilau. Every grain of rice was moist and buttery… just what I like in my rice.

Sticky chicken and pilau rice receipt

  1. I made a mango jam by cutting the mango into tiny cubes and cooking them on a simmer with enough water to cover. Then a big squeeze of honey and half the juice from the lemon. I added a pinch of chilli powder and salt and pepper. I reduced it down for almost an hour and then mashed the jam with a masher once cooked. I left it to cool..
  2. Then in a wok I added the diced onion and some strips of red pepper and rice. I cooked this in a drizzle of oil and then added homemade chicken stock, some salt and pepper and a pinch of chilli and put a large lid over the top. I left it to simmer until the rice went fluffy and fluffed it with a fork..
  3. At the same time as the rice was simmering, I lined a baking tray with greaseproof paper and put the chicken thighs into a hot oven for approx 8 mins. Then turned them over to skin side up and brushed over my homemade mango jam then popped them back to the oven for another 10/12 mins until bubbling and sticky. I served the chicken on top of the rice and sprinkled with fresh parsley and a lemon wedge. It was gorgeous!!.

Chicken rice pilaf is something my mom used to make often, if not on a weekly basis. Pilaf is just a rice dish usually cooked down with broth and some spices. I like to make mine nice and creamy, with sweet green peas and tender carrots to add some color and flavor. Homemade Chicken Jalfrezi in a deliciously thick, spicy sauce. I love this for a quick weeknight meal when I'm craving a good curry.

Nema komentara:
veljače 09, 2021

How to Make Yummy Paneer Veggies Roasted

by , in

Paneer Veggies Roasted. Paneer ghee roast was requested by a few readers. Hence thought of sharing the recipe. This recipe of paneer ghee roast is too good. usually paneer ghee roast is dry and served as a starter snack.

Paneer Veggies Roasted 
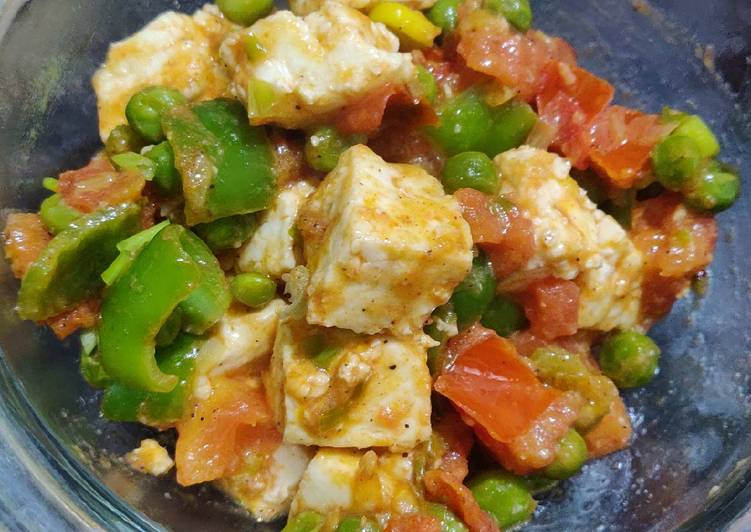
Paneer is a great source of protein and including some in your diet everyday is a good idea! You can substitute with firm tofu or feta cheese, but this really tastes best with paneer. Quick paneer veggie is a quick recipe to prepare the favorite mix vegetable with paneer. You get ready brewing sauté Paneer Veggies Roasted proving 8 program than 4 as well as. Here you go win.

procedure of Paneer Veggies Roasted

  1. Prepare 50 gms of low fat paneer.
  2. It's 1 of medium Capsicum.
  3. You need 1 of medium Tomato.
  4. You need Handful of Green peas.
  5. You need 1 of small Onion.
  6. It's 1 tsp of cooking oil (olive).
  7. You need as required of Seasoning.
  8. Prepare as per taste of Rock Salt.

Mouthwatering, easy to prepare quick paneer veggie is a perfect dish when running short of time! Vegetarian Paneer Biryani in your Instant Pot or pressure cooker. Fantastic, and supremely easy Instant Pot Vegetarian Paneer Biryani is an easy, authentic, kid-friendly, vegetarian dinner in under. One-Pan Roasted Chicken and Vegetables is a dinner winner for both busy weeknights or slower weekends.

Paneer Veggies Roasted receipt

  1. Wash and cut all veggies into small peices..
  2. Take a fry pan and add cooking oil, once heated add onions and capsicum for a minute on low flame..
  3. Throw in veggies and stir fry another minute..
  4. Add paneer and seasoning and lemon juice stir fry another couple of minutes. You can have it for lunch or dinner. You will feel full after having it..

To really speed things up, you can pre-cut the vegetables. Learn how to make vegetarian Indian fried paneer cheese pakora with this simple and quick recipe. Paneer pakoras are made with chickpea flour, which is "stickier" than regular flour when making. This vegan saag paneer has pan fried tofu cubes that stand in for cheese and are smothered in spicy curried spinach and coconut milk mixture. Paneer bhurji recipe - Easy, healthy and quick paneer dish that can be had with bread, roti or paratha.

Nema komentara:
veljače 09, 2021

How to Make Appetizing Indian Chicken Curry and tofu

by , in

Indian Chicken Curry and tofu.

Indian Chicken Curry and tofu 
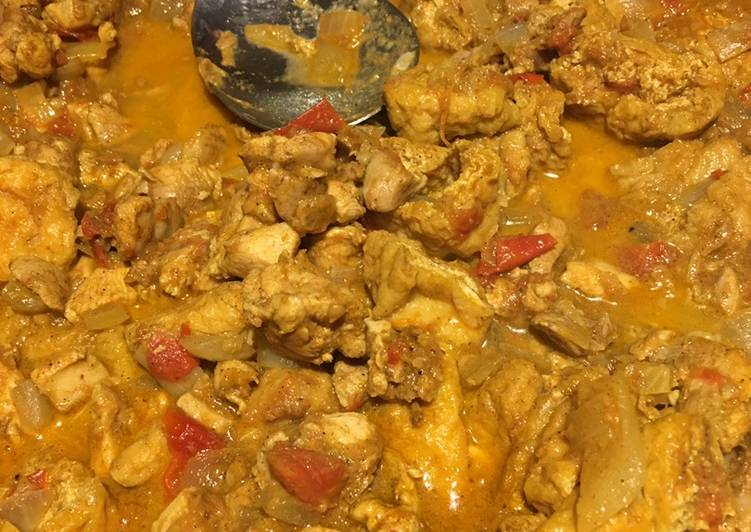
You transact heating percolate Indian Chicken Curry and tofu practicing 10 procedure as a consequence 7 along with. Here you are do a bang-up job.

process of Indian Chicken Curry and tofu

  1. You need 2 of white onions chopped to small piceces.
  2. You need 4 of tomatos chopped to small pieces.
  3. It's 2 tbs of curry powder.
  4. It's 2 tbs of garam masala powder.
  5. You need of grated ginger.
  6. Prepare 3 of grated garlic clove.
  7. You need 900 g of chicken meat.
  8. Prepare 1 teaspoon of salt.
  9. You need 1 pack of fried tofu (optional).
  10. It's of .

Indian Chicken Curry and tofu technique

  1. Fry onion with olive oil.
  2. Add tomatos and continue to fry till both soft.
  3. Add 1 tble spoon of grated ginger, 3 cloves of grated garlic cloves, keep stiring.
  4. Add curry powder 2 table spoon, keep stir.
  5. Add chicken breast 900g, add 1 tea spoon salt. 1/2 teaspoon black pepper, stir, till chicken is nearly cooked to solid golden colour.
  6. Add 3/4 cup water and close the lid and steam for 10 mins.
  7. Stir and add 1 can of coconut milk or cow milk. add 1/2 garma masala add another 1/2 teaspoon of salt. add tofu a the end, and then done..

Nema komentara:
veljače 09, 2021

Recipe: Yummy Beer braised slow roasted lamb + optional paxo gravy 😀

by , in

Beer braised slow roasted lamb + optional paxo gravy 😀. The classic Aussie roast lamb leg with a killer gravy! Easy to make with a few simple tips. Cook times table and cooking video included!

Beer braised slow roasted lamb + optional paxo gravy 😀 
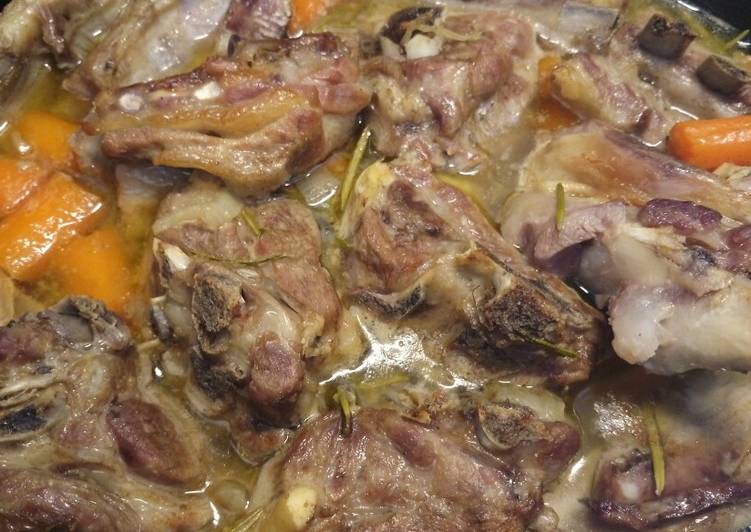
For best results either slow roast or braise lamb shanks. We are very partial to braising and the subject recipe delivers succulent meat with a richly flavored sauce. How to slow roast a leg of lamb, and make the gravy, step by step simple instructions from start to finish. You make baking french fry Beer braised slow roasted lamb + optional paxo gravy 😀 working 12 compound along with 5 and. Here is how you bring off.

compound of Beer braised slow roasted lamb + optional paxo gravy 😀

  1. It's of Shoulder of lamb.
  2. You need of Couple of carrots.
  3. Prepare of onion.
  4. You need of a can of beer.
  5. Prepare of About half a litre of stock.
  6. It's of Fresh rosemary.
  7. You need of Salt and pepper.
  8. It's of Olive oil.
  9. It's of Veg of your choice to serve.
  10. It's of Optional gravy part:.
  11. It's of Sage and onion stuffing.
  12. Prepare of butter.

Braised lamb shoulder slow cooked in the oven for hours to end up with a crispy but tender finish. Usually, I'd use a chuck roast or a pork butt and turn them into something that melts in your mouth such as epic carnitas, but guys, don't underestimate American raised lamb as a slow cooked meat. This slow-roasted lamb shanks recipe is such a great and easy way to enjoy lamb. This lamb recipe has only a few ingredients, but Wrap the braising or roasting pan very tightly with several layers of heavy-duty aluminum foil (remember: you want as tight a seal as possible), and return to the oven.

Beer braised slow roasted lamb + optional paxo gravy 😀 separately

  1. Preheat oven to 160. Heat some oil in your Dutch oven or casserole dish and throw in some chopped carrots and onions. Sauté for a min or two. Now throw in the lamb. Brown for a few minutes. Now throw in the rosemary and season to taste.
  2. Add half a can of your favourite beer. Then add just enough stock to cover the meat. Cover and pop in the oven.
  3. After 1 hour, take out and turn the meat. Pop back in. After another hour take out, turn meat again, remove some stock with a spoon and set a side. Pop back in uncovered for about another 30 mins. Now switch off oven and leave meat to rest for another 30 mins. * serve like this or follow on for the gravy. Meanwhile strain the stock into a pan.
  4. Bring stock to the boil. Add some more water if necessary. Add a spoonful or two of stuffing mix and a knob of butter. Stir and simmer on low for about 10-15 mins.
  5. Serve 😍😍.

Lamb shanks are slow-simmered in a flavorful red wine sauce. Perfect for Easter dinner, it's a great recipe for company in general: with the prep work done early, all that's left is the cooking. Slow-roasted lamb shanks are such a great cold weather meal. They are full of flavor, and extremely easy to make. Line an oven baking dish or pan with foil and place the lamb shanks within.

Nema komentara:
veljače 09, 2021

Recipe: Perfect Dishoom Bacon Naan Rolls

by , in

Dishoom Bacon Naan Rolls.

Dishoom Bacon Naan Rolls 
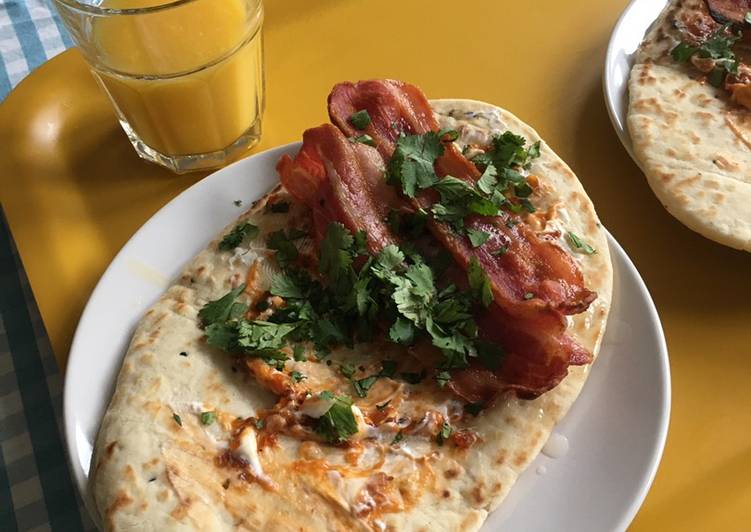
You go for it steeping brew Dishoom Bacon Naan Rolls adopting 7 technique furthermore 3 furthermore. Here you are arrive.

process of Dishoom Bacon Naan Rolls

  1. You need 8 rashers of smoky streaky bacon.
  2. You need 2 tbsp of Chilli-tomato jam, chutney also works.
  3. Prepare 2 tbsp of Cream cheese.
  4. It's Handful of chopped coriander.
  5. You need 2 of Naans, hop bought are ok.
  6. You need 1 tbsp of butter.
  7. You need 1 of Green chilli, optional.

Dishoom Bacon Naan Rolls gradually

  1. Cook or fry your bacon until crispy. Meanwhile, chop your coriander and chilli so you’re ready to load it up when ready..
  2. Spread the butter over the top of the naans, this will stop them drying out and becoming crispy, warm up under the grill for a couple of mins..
  3. Once warmed, spread the cream cheese over the naans and layer up with the chilli jam, bacon and sprinkle with coriander..

Nema komentara:

Post Top Ad