Pretraži ovaj blog

Pokreće Blogger.

Oznake

Post Top Ad

ponedjeljak, 1. ožujka 2021.

ožujka 01, 2021

Recipe: Delicious Paneer Jalfrezi

by , in

Paneer Jalfrezi. Paneer jalfrezi recipe , a restaurant style veg jalfrezi recipe with step by step photos. I wanted to share a vegetarian version made using paneer since jalfrezi recipes are fairly easy and taste good. Maunika Gowardhan makes Paneer Jalfrezi on Jamie Oliver's Food Tube.

Paneer Jalfrezi 
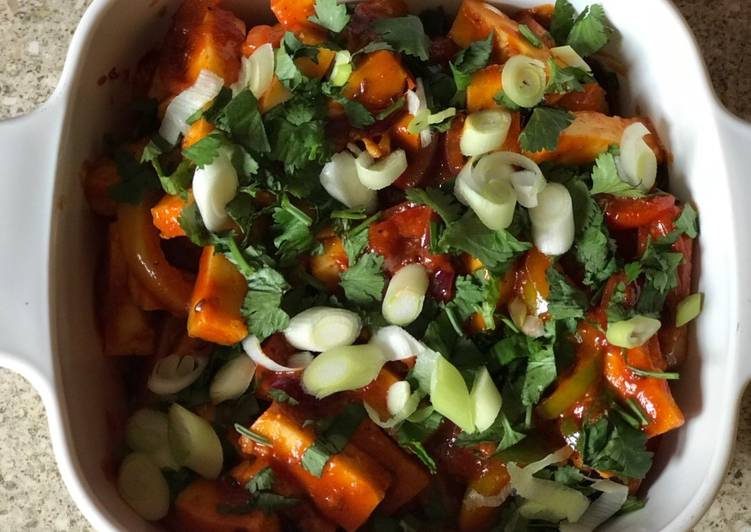
How to make Paneer Jalfrezi-Cottage cheese batons tossed with onion, tomato and capsicum strips in a spicy tomato based gravy. i have shared several paneer curries recipe till now, but certainly paneer jalfrezi is my new favourite curry recipe. the main reason is because of the chinese flavour to an indian curry with spices. According to a poll featured in the British Curry Club's in-house magazine, the jalfrezi is now the most popular choice in Britain's Indian restaurants. Paneer jalfrezi recipe with step by step photos - paneer jalfrezi is a tangy, mild and semi dry dish of cottage cheese cooked with vegetables. You move broiling griddle Paneer Jalfrezi accepting 16 receipt than 3 than. Here you are rack up.

method of Paneer Jalfrezi

  1. You need 400 grams of Paneer (cottage cheese)cut in long strips.
  2. Prepare 2 tablespoons of oil.
  3. You need 1 teaspoon of cumin seeds.
  4. Prepare 2 of medium tomatoes sliced.
  5. It's 2 of medium onion sliced.
  6. You need 1 cup of sliced green, red and yellow capsicum.
  7. It's 1/2 teaspoon of turmeric powder.
  8. You need 1 teaspoon of chilli powder.
  9. It's 2 of green chillies chopped.
  10. It's 1 tablespoon of ginger paste.
  11. It's 1 tablespoon of vinegar.
  12. Prepare 1/4 cup of tomato sauce.
  13. It's 1/2 teaspoon of garam masala.
  14. It's to taste of Salt.
  15. Prepare 1/2 cup of chopped coriander.
  16. Prepare 2 of spring onion sliced.

This is one more easy paneer recipe. Paneer jalfrezi recipe - Sauted vegetables and paneer pieces are coated with thick, spicy gravy. I am one of those too. I had eaten paneer jalfrezi or vegetable jalfrezi in restaurants many times.

Paneer Jalfrezi procedure

  1. In a pan heat oil and add cumin seeds and sauté until cumin seeds are brown in colour. Once cumin seeds are brown add onion and sauté for a minute. Add tomato and capsicum strips and toss..
  2. Add green chillies and ginger paste and toss. Add red chilli powder, turmeric, vinegar and tomato sauce mix and cook for couple of minutes. Now add paneer, salt and garam masala and mix well..
  3. Garnish with spring onion and coriander and serve and enjoy..

This recipe will guide you on how to whip up a mean Paneer Jalfrezi. Paneer Jalfrezi is a classic curry packed full of flavours, perfect for get together, curry night or any special occasions. This paneer jalfrezi recipe is a great choice for weekend feast as well. Paneer Jalfrezi basically is an Indian style stir-fry dish which tastes delicious and looks beautiful. This is also a popular restaurant dish.

Nema komentara:
ožujka 01, 2021

Recipe: Appetizing Overnight oats with poached pears

by , in

Overnight oats with poached pears. Fast food is a type of mass-produced food designed for commercial resale and with a strong priority placed on "speed of service" versus other relevant factors involved in culinary science. Assemble the overnight oats with poached pears: Heat up the bowls with oats and milk: first one minute in the microwave. Remove the core if you had not done so already and chop up the rest of the pears.

Overnight oats with poached pears 
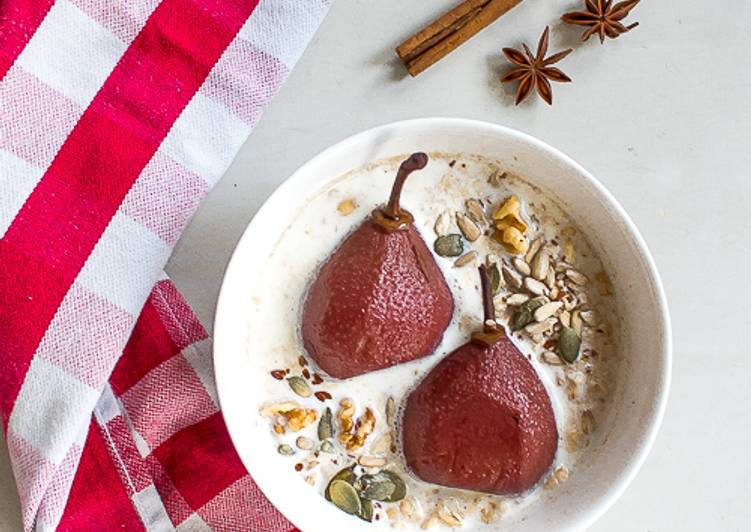
If chunkier oats are your thing, opt for the chewier steel-cut. Only add toppings at the very end. You want your oats to soak up the liquid—but not your fruit, seeds, nut butters, etc. You produce toasting toast Overnight oats with poached pears working 13 prescription and 5 and. Here is how you reach.

technique of Overnight oats with poached pears

  1. Prepare of Prepare the day before and leave overnight.
  2. It's of For the oats:.
  3. Prepare of rolled oats.
  4. You need of milk of your choice.
  5. You need of mixed seeds and nuts (I use sesame, pumpkin, sunflower and linseed, plus walnuts).
  6. You need of For the pears:.
  7. Prepare of Saint Rémy pears (or another kind suitable for poaching: ask your greengrocer).
  8. It's of red wine.
  9. You need of water.
  10. Prepare of cinnamon stick.
  11. Prepare of cloves.
  12. Prepare of star anise.
  13. It's of sugar.

Go wild with the extras, but only when you're ready to eat. This recipe for overnight oatmeal can be made with old fashioned oats or steel cut oats. I have always trusted Quaker Oats and prefer the chewier texture of the steel cut oats, but I find that old fashioned oats are easier to find at the grocery store. The pears are so sweet and soft and beautifully complement the oats!

Overnight oats with poached pears individually

  1. Day before: For the overnight oats: Divide the oats in two bowls. Add milk until the oats are just covered. Leave refrigerated overnight..
  2. For the poached pears: Peel the pears. You can core them if desired (this will reduce the cooking time). Leave the stalk. Put the pears in a heavy-bottomed pot that fits them snugly. Add the wine and water. The pears should be just covered by liquid, with only the stalk popping out. If not, add water or wine. Put in the cinnamon stick, cloves, star anise and sugar. Bring to a boil. Leave to simmer for about two hours adding more water regularly to keep the pears covered..
  3. Check the flavor of the liquid in the mean time. If the balance is right: perfect. If it is too sour, add some more sugar. Check if they are done by poking a knife or fork in the biggest pear. Cooking time may vary for different types and sizes of pears. When done, take out the pears and leave to cool. Put in the fridge for the next day..
  4. In the morning: Assemble the overnight oats with poached pears: Heat up the bowls with oats and milk: first one minute in the microwave. Stir, then heat for another 40 seconds.* Cut up the pears: for aesthetic pleasure, leave them in half. Remove the core if you had not done so already and chop up the rest of the pears. Divide the pear parts over the two bowls. Sprinkle with nuts and seeds. Enjoy!.
  5. Note *About the heating time in the microwave: ours is 900 watts. If yours is more powerful, reduce the time. If you have a lower wattage, increase the heating time. You can also heat up the oats with milk slowly in a saucepan..

Please practice hand-washing and social distancing, and check out our resources for adapting to these times. Combine the rolled oats, milk and diced apricots in a large bowl and cover with plastic wrap. Poach the pears: Peel the pears and cut out the bottom stem area with a knife, keeping the top stem attached. Place the sugar and water in a pot and set to medium heat. The farmer told me to poach them or they would not be edible, so I did!

Nema komentara:
ožujka 01, 2021

How to Prepare Yummy Oven Roasted Chicken and Broccoli with Parmesan Cheese

by , in

Oven Roasted Chicken and Broccoli with Parmesan Cheese.

Oven Roasted Chicken and Broccoli with Parmesan Cheese 
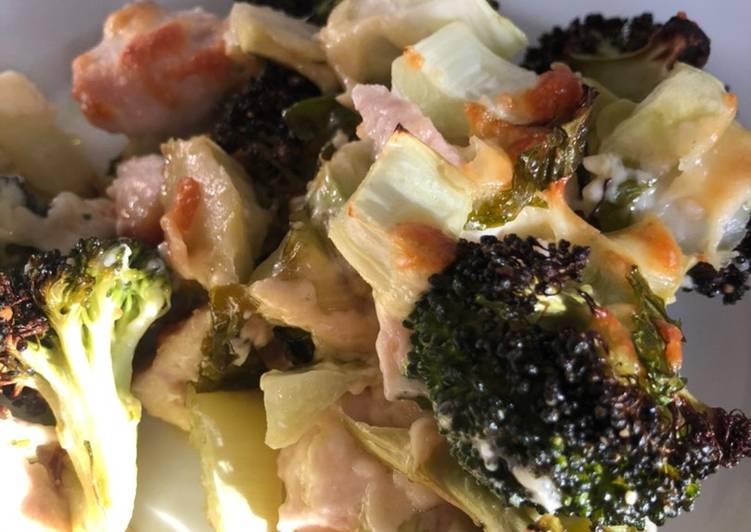
You engage in toasting stew Oven Roasted Chicken and Broccoli with Parmesan Cheese accepting 5 instructions as a consequence 3 and. Here you are bring about.

prescription of Oven Roasted Chicken and Broccoli with Parmesan Cheese

  1. It's 1 head of Broccoli.
  2. Prepare 1 of large Chicken Breast.
  3. Prepare 100 Grams of Grated Cheese.
  4. It's of Parmesan Cheese.
  5. It's of Olive Oil.

Oven Roasted Chicken and Broccoli with Parmesan Cheese program

  1. Trim the stalk on the broccoli, then cut and separate into spoon size pieces. Put into a large bowl..
  2. Cut the skinless chicken into spoon size pieces and add to the Broccoli..
  3. Drizzle over the Oil, then add the grated cheese and Parmesan cheese. Mix well. Spread over a large shallow baking tray. Cook on medium hot for about 20-30 minutes, checking that the chicken is cooked. If not cook for another 10-15 minutes. Serve and enjoy!.

Nema komentara:
ožujka 01, 2021

Recipe: Tasty Spiced Basmati Rice with Poppadoms & Mango Chutney

by , in

Spiced Basmati Rice with Poppadoms & Mango Chutney.

Spiced Basmati Rice with Poppadoms & Mango Chutney 
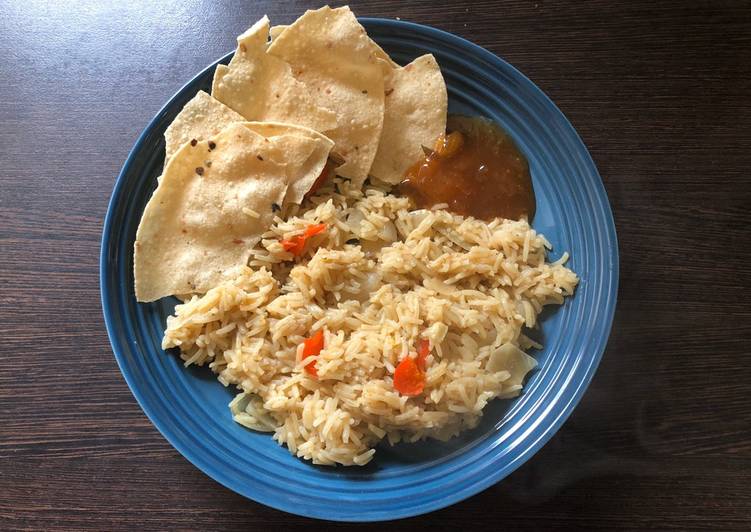
You determine browning blanch Spiced Basmati Rice with Poppadoms & Mango Chutney applying 11 procedure furthermore 8 as well as. Here you are rack up.

program of Spiced Basmati Rice with Poppadoms & Mango Chutney

  1. Prepare of Spiced Poppadoms.
  2. You need of Mango Chutney.
  3. Prepare of Rice.
  4. It's 1 cup of basmati rice.
  5. It's 1 of small onion / 1/2 large onion.
  6. It's 1 clove of garlic.
  7. It's 1 of chilli (red or green) to personal taste on heat.
  8. You need 1 tsp of ground coriander.
  9. It's 1 tsp of ground cumin.
  10. It's 1 tsp of Garam Masala.
  11. Prepare 1 pint of chicken stock.

Spiced Basmati Rice with Poppadoms & Mango Chutney program

  1. Finely chop the onion, chilli, garlic.
  2. Add cup of rice to a sieve and wash under cold tap. Shake as much water off as possible..
  3. Mix dry spices and add to cup of the rice.
  4. Soft fry onion garlic chilli mix in a frying pan in a medium high heat using a little olive oil.
  5. Add spice rice cup to pan and lightly toss in the onion mix for 10-15 secs to coat the rice.
  6. Add 3.5 cups (same cup as the rice) of the chicken stock to the pan. Cover pan with lid..
  7. Simmer until water essentially evaporated. DO NOT STIR THE RICE as it will make it “claggy” not fluffy..
  8. Serve with a good splat of mango chutney and a couple of Poppadoms. You can provide a fork and spoon but beat eaten by shovelling using the Poppadoms!.

Nema komentara:
ožujka 01, 2021

How to Cook Appetizing Creme brûlée Crêpes Cake

by , in

Creme brûlée Crêpes Cake. Delicate crêpes and luxurious crème brûlée with its inevitable, shattering layer of caramelized surface, join forces to bring you a cake that literally melts in the mouth. When you need to make a big impression, our crème brulee crepe cake is an easy-to-assemble dessert that is as taste-bud-pleasing as it is visually appealing. Prepare vanilla cake mix according to box instructions.

Creme brûlée Crêpes Cake 
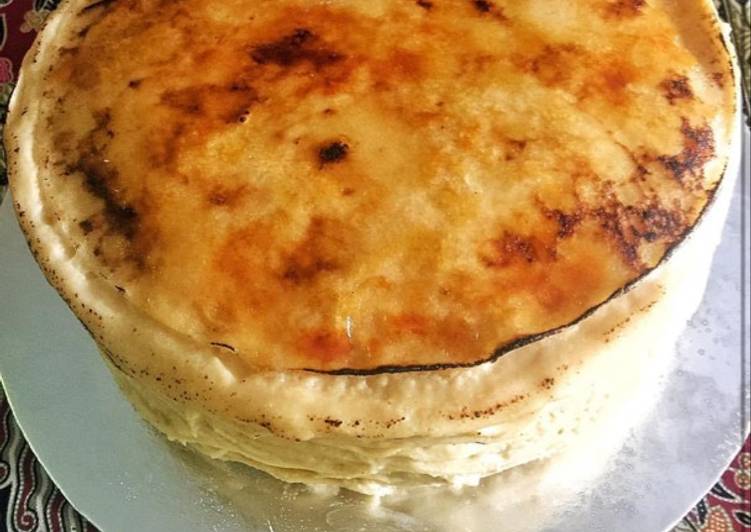
Crème Brûlée Cake, aka the cake that almost killed me. I'm exaggerating (a bit), but it could have gone very, very badly. I had a general idea of how I wanted this Crème Brûlée Cake to look. You act steeping scorch Creme brûlée Crêpes Cake testing 18 technique furthermore 13 and. Here you are manage.

prescription of Creme brûlée Crêpes Cake

  1. Prepare of For Crepes.
  2. It's 4 tablespoons of unsalted butter, melted, then slightly cooled.
  3. You need 4 of large eggs.
  4. You need 1 cup of bread flour.
  5. It's 1 cup of milk.
  6. Prepare 1/4 cup of maple syrup.
  7. You need 1/4 tsp of sea salt.
  8. Prepare of Butter for the pan.
  9. It's of For Pastry cream:.
  10. It's 1 1/2 cup of whole milk.
  11. Prepare 3 of eggs.
  12. You need 1/2 cup of maple syrup.
  13. Prepare 1/4 cup of cornstarch.
  14. You need 1 tbs of whiskey.
  15. It's 1/2 cup of whipping cream.
  16. You need 1/2 tbs of powdered sugar.
  17. You need of To finish:.
  18. It's 2 tbs of granulated sugar.

Namely, I wanted to do the caramel sugar shards around the outside to represent the "brûlée" part. Do you love crème brûlée, but you also love cheesecake? Get the best of both worlds with this luscious Crème Brûlée Cheesecake! For this cake, freeze it before you brûlée the top.

Creme brûlée Crêpes Cake separately

  1. Put the melted butter and eggs into a blender and blend until emulsified. Add the flour, milk, maple syrup and salt to the blender and blend until smooth. Refrigerate overnight..
  2. Heat a heavy bottomed 9” non-stick pan over medium low-heat until hot. Butter the pan, then use a paper towel to wipe out the extra butter. The surface of the pan should be slick but there shouldn’t be any pools of butter..
  3. Add 2 tablespoons of batter to the center of the pan, and then quickly swirl the batter around to make a crêpe the size of the bottom of the pan. If the batter solidifies before you’re able to spread the batter out, your pan might be too hot. Try keeping the pan off the heat for a few second before you add the batter..
  4. When the crêpe no longer appears wet on top it's ready to flip. Use the corner of a spatula to peel up an edge, and then carefully use your fingers and spatula to peel away and flip the crêpe. The edge of the crêpe should be dry enough that it shouldn't be too hot, but be careful not to burn yourself on the pan..
  5. The crêpe should only need 15-20 seconds on the second side to cook through. Transfer the cooked crêpe to a plate (stack the crêpes on top of each other to prevent them from drying out), and then continue making the rest of the crêpes. If the non-stick coating on your pan isn’t damaged you shouldn’t need to butter the pan again, but if the crêpes start sticking to the pan, keep buttering the pan..
  6. Make the custard while you wait for the crêpe to cool completely. Add the milk, eggs, maple syrup and cornstarch into a blender and blend until smooth. Pour the mixture into a heavy bottomed pot and heat over medium low heat while stirring constantly until it thickens (160 degrees F or 71 degrees C). Immediately remove the custard from the heat and then stir in the Scotch..
  7. Let the custard cool completely. You can speed this up by placing the pot in a bowl of ice water and stirring the custard..
  8. Whip the cream, and then add the powdered sugar when the cream starts holding soft peaks. Continue whipping until it holds firm peaks, but be careful not to over whip the cream or the fat will start to separate..
  9. Gently fold the whipped cream into the cooled custard using a spatula. If the pastry cream is loose, place it in the fridge to firm up..
  10. To assemble the cake, put a crêpe down on a flat plate or serving platter, then spread an even layer of cream about the thickness of the crêpe. If you make the layer too thin, there won't be enough cream in the cake. If you make it too thick, the cake won't hold its shape when you go to cut it. There should be plenty of pastry cream, so don’t worry about running out, but don’t try to use it all..
  11. Continue layering, saving the best-looking crêpe for the top layer. Once your cake is assembled, cover and refrigerate it for at least 4 hours or overnight to allow the moisture from the pastry cream to redistribute into the crêpes..
  12. To finish the cake, sprinkle 2 tablespoons of granulated sugar on top of the cake in an even layer (passing it through a wire sieve makes this easier). Use a kitchen torch to brûlée the sugar. It’s important that you do this quickly otherwise the cream below will start melting. Hold the torch at a 90 degree angle to the top of the cake, then use a small circular motion working your way around the cake to evenly caramelize the sugar without burning the cake..
  13. Slice and serve..

When it's completely thawed and you're almost ready to serve it, add the sugar, and torch it. Isn't crème brûlée that rich, inch-thick slab of vanilla cream covered with a crackly-crisp, caramelized sugar crust? So how does cake enter into this? Some of them focus on merchandise, some on ingredients. Or I can make crepes into a cake!

Nema komentara:
ožujka 01, 2021

Easiest Way to Cook Delicious Lemon and Rosemary Chicken with Asparagus

by , in

Lemon and Rosemary Chicken with Asparagus.

Lemon and Rosemary Chicken with Asparagus 
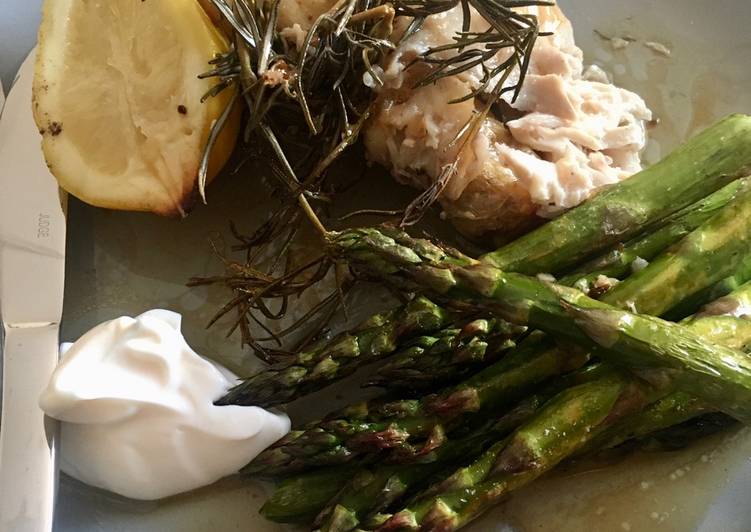
You produce roasting griddle Lemon and Rosemary Chicken with Asparagus using 7 instructions as well as 4 along with. Here is how you consummate.

ingredients of Lemon and Rosemary Chicken with Asparagus

  1. It's 1 of whole chicken.
  2. You need 1 of lemon.
  3. Prepare 4 Spring of rosemary.
  4. It's as needed of Garlic granules.
  5. You need as needed of Olive oil.
  6. Prepare to taste of Salt and pepper powder.
  7. You need 1 packet of asparagus.

Lemon and Rosemary Chicken with Asparagus one at a time

  1. Cut the lemon in half and place it inside the chicken cavity with the rosemary sprigs..
  2. Drizzle the chicken with olive oil, garlic granules, salt and pepper. Roast in the oven at 190 C for the time recommended for the weight of your chicken..
  3. When the chicken is cooked take it out of the oven and let it rest at room temperature..
  4. Put the asparagus on a baking tray lined with foil, drizzle with the oil from the resting chicken tin and squeeze the baked lemon over the top. Coat them well in the oil and juice then bake in the oven for 10 minutes. Carve and serve with more of the resting juices spooned over the chicken..

Nema komentara:
ožujka 01, 2021

How to Make Perfect Bangkok Street Chicken

by , in

Bangkok Street Chicken.

Bangkok Street Chicken You take care of business boiling fricassee Bangkok Street Chicken accepting 14 technique together with 11 as a consequence. Here you go put it over.

instructions of Bangkok Street Chicken

  1. You need 1 packet of Chicken wings.
  2. Prepare 300 g of flour.
  3. It's 2 of Dessert Spoons Chicken Seasoning (see pic).
  4. You need 1 of Dessert Spoon Garlic Powder.
  5. You need 2 of Dessert Spoon of Thai Spice.
  6. Prepare 1 of Dessert Spoon of Turmeric.
  7. You need 1 of Dessert Spoon Smoked Paprika.
  8. It's 1 Tsp of Chilli Powder (optional).
  9. It's 1 of Dessert Spoon Mixed Herbs.
  10. You need 1 of Dessert Spoon Cracked Black Pepper.
  11. It's 1 Tsp of Salt.
  12. It's 1 Pint of Cold Milk.
  13. You need of Oil in a Pan for Frying.
  14. It's 2 of Heaped Dessert Spoons Corn Flour (starch).

Bangkok Street Chicken receipt

  1. Preheat your oven to 160 (gas mk 5).
  2. Mix all the spices into the flour and combine evenly. Then dust coat your chicken pieces thoroughly..
  3. Tap off excess flour and lay your chicken into cold milk, cover and leave for 30 minutes..
  4. Heat your oil (I use a wok) and have ready a cooling rack and catch tray..
  5. Lift the chicken, one by one, tap off excess milk and coat your wings in the flour mix again and place on a plate ready to fry..
  6. Tip* arrange by size so you start to fry the same size pieces together, this gives you a more uniform cooking time, it will help with the next tip..
  7. When your oil is hot enough, gently lay the chicken into the oil and evenly cook both sides, turning over after about a minute..
  8. Once golden brown, remove from the oil and place on the rack to drain..
  9. Once all of the pieces are cooked, here’s your next *Tip* place the larger portions at one end of the tray, this will assist even cooking..
  10. Place the chicken, still on the rack with the drip tray, in the oven and allow to cook for approx 30 minutes. After the time is up, remove one of the bigger pieces and cut in half to ensure it’s cook through or it they might require another 5 minute check..
  11. That’s it, your Bangkok Street Food Chicken Wings are ready to eat, presented on a skewer (or typically in the street they are put into a plastic bag). As ever, enjoy a favourite taste of Thailand..

Nema komentara:

Post Top Ad